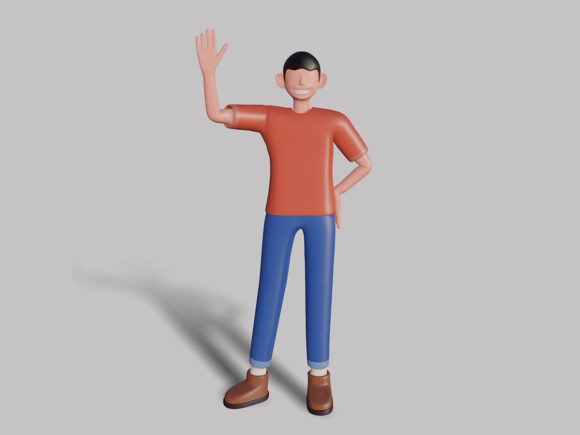
3D Male Character Waving Premium PSD: What You Need to Know Before You Use It
If you’ve searched for a ready-made 3D character to drop into your next project, you’ve likely come across a “3D Male Character Waving Premium PSD.” It sounds like an easy win: a polished, pre-rendered person waving his hand, ready to be placed in an ad, website, or presentation. But as someone who has worked with hundreds of PSD templates and 3D assets over the years, I can tell you there is more to these files than meets the eye. A premium PSD is not automatically a smart purchase. Without the right expectations and a few key checks, you can end up with something that looks stiff, doesn’t scale well, or takes far more time to edit than you planned.
This guide covers the most common mistakes people make when choosing and using a 3D Male Character Waving Premium PSD and explains how to avoid them. Whether you’re a marketer building landing pages, a freelancer looking for a hero image, or a small business owner handling your own design, the practical advice below will help you get real value from your asset.
Mistake 1: Assuming “Premium” Means Perfectly Rigged for Your Use
The word “premium” gets thrown around loosely. A premium PSD of a 3D character waving is often a pre-rendered image broken into layers. It is not a full 3D model you can rotate or animate in Blender or Cinema 4D. If you need to change the camera angle or the waving hand gesture, you may be stuck with what you see.
What this mistake costs you: You purchase a file that looks great in the preview but fails to fit your layout. The perspective doesn’t match your background, or the wave seems directed at the wrong spot.
Better approach: Before downloading or buying, read the description carefully. Look for phrases like “multi-angle” or “front and side views.” If the file only contains one render, treat it as a static element. Plan your composition around that fixed pose. If you need flexibility, invest in a 3D model file (FBX, OBJ) instead of a PSD render.
Mistake 2: Ignoring Layer Structure and Organization
A premium PSD is supposed to be editable, but not all layer structures are created equal. I’ve seen files where the character, background, shadows, and reflection are all merged into one flat layer. That defeats the purpose of having a PSD.
Real-world example: You want to place the waving character over a scenic photo. You try to remove the white or gray background from the original file, but because it’s rasterized and not separated, you end up with messy edges and lost shading.
What to check: Open a sample screenshot (if provided) or read the file contents. Look for separate folders: character body, clothing, hand, shadow, and background. A well-organized PSD has descriptive names like “body_shirt,” “skin_arms,” “hand_wave,” and “shadow_floor.” If these are absent, expect a difficult editing process.
Practical advice: Before purchase, message the seller (if on a marketplace) asking for a screenshot of the layer panel. If they cannot provide one, consider the file risky. For free downloads, inspect the layers immediately after opening; if it’s flat, save yourself hours and look elsewhere.
Mistake 3: Overlooking Scaling and Resolution Limits
A waving character that looks crisp on a mobile screen might become pixelated on a billboard. Many premium PSDs come in fixed resolutions—often 3000x3000 pixels or similar. That number sounds large, but if you need to crop tightly or use the character as a full-page hero image, you may run out of pixels.
How this affects results: Your design gets rejected because the character appears soft or blurry when printed. Or you stretch the layer, distorting proportions.
Better choice: Always check the document dimensions before committing. For web use, 72 dpi at 2000–3000 px is fine. For print, you want at least 300 dpi. If the PSD is smaller than you need, look for a version that offers a higher resolution or a vector-based character (though rarer). You can also upscale using AI tools, but that often introduces artifacts in the skin tones or clothing details.
Mistake 4: Not Verifying Shading and Lighting Direction
The character is rendered with a specific light source. If your scene has sunlight from the left but the character is lit from the top right, the result looks unnatural—like a poorly composited stock photo.
Why it’s overlooked: Beginners often focus on the character’s pose and expression, forgetting that lighting consistency is what makes a composition believable.
What to do: Examine the preview images for cast shadows and highlights. If the character has a strong rim light on one side, plan your background accordingly. Some premium PSDs include separate shadow layers that let you rotate or reposition the shadow. If that’s available, use it to match your environment. Otherwise, you may need to rebuild the shadow in Photoshop manually.
Mistake 5: Forgetting to Check the License for Commercial Use
A “premium” label does not automatically grant full commercial rights. Some files are sold with restrictions: you cannot use the character in merchandise, for trademarks, or in downloadable templates that you resell.
Real scenario: You use the waving character as the mascot for your e‑commerce brand. Later, you receive a cease-and-desist because the license only allowed personal use. This mistake can cost hundreds in legal fees and a complete rebrand.
How to avoid it: Before payment, read the license terms (often a separate document or tab). Look for “commercial use allowed,” “extended license required,” or “no resale of digital assets.” If it’s unclear, ask the creator directly. For clients, always keep a copy of the license to prove your right to use the asset.
Mistake 6: Assuming the Character’s Proportions Fit Your Audience
3D male character waving PSDs often feature a generic, stylized body type: athletic, young, and neutral. This look works for many projects, but not all. If your target audience is seniors, professionals in a formal setting, or a specific demographic, a cartoonish or overly fit character can feel out of place.
Example: A financial services website uses a bright, kawaii-style waving character—visitors may not take the content seriously.
Better selection: Look for characters with realistic proportions (e.g., business casual clothing, natural skin tones) or consider purchasing a character with interchangeable clothes/skins if you need to match a specific brand identity. Some premium PSDs come with multiple outfit options—those are more versatile.
Mistake 7: Not Testing Modifications Early
You download the file, open it, and realize the waving hand is on the wrong side (left instead of right). Or the skin color doesn’t match your palette. Instead of adjusting, you accept a suboptimal result.
Why that hurts: The final product will always feel slightly off, reducing user engagement or professional impression.
What to do: As soon as you open the PSD, test the most obvious edits: change the background color, swap an arm (if smart objects are used), adjust the hue of the shirt. If the file uses adjustment layers and clipping masks, your workflow will be smooth. If it requires full repainting, reconsider using that asset. A good premium PSD should let you change the character’s shirt color in under 30 seconds.
Mistake 8: Neglecting File Size and Performance
Some premium PSDs are 1 GB or more because they include high-resolution textures, many layers, and hidden raster art. That can slow down your computer, cause crashes in older versions of Photoshop, and make collaboration painful (email limits, slow uploads).
How to decide wisely: Look at the file size before downloading. For most web and social media projects, a 50–150 MB PSD is sufficient. Larger files often have unnecessary duplicate layers or 4K backgrounds you don’t need. You can reduce size by flattening parts you won’t edit, but that gets messy. Better to choose a leanly built PSD that matches your screen resolution.
Mistake 9: Missing the Opportunity to Combine with Other Assets
A single waving character is useful, but great designs often combine multiple elements: speech bubbles, icons, additional people, or environmental props. Many artists buy a standalone PSD and treat it as the entire visual, missing the chance to build a richer scene.
Correction: Use the character as a starting point. Because it’s a PSD, you can place it on a layer between a background image and foreground shadows. Add a simple text box next to the waving hand to create a call-to-action. The waving gesture naturally draws attention—leverage that by integrating it with your message.
Before You Click“Download”: A Quick Checklist
- Resolution: Does the PSD meet your output size (web, print, or both)?
- Layer structure: Are the body parts, shadows, and reflections separated? Are smart objects used?
- Lighting: Is the light direction clear and adaptable? Are shadow layers editable?
- Licensing: Can you use it commercially? Are there restrictions on reselling or modifications?
- Character style: Does it match your brand’s tone? Can skin tone or clothing be changed easily?
- File size: Is it manageable on your hardware? Are there redundant layers you can remove?
- Unique features: Does it include extra poses, expressions, or props? Bonus variations often save time.
Take ten minutes to verify these points. That investment will save hours of frustration and ensure the 3D Male Character Waving Premium PSD becomes a valuable tool in your creative library, not a regretted impulse buy.
Final Thoughts: Make the Asset Work for You, Not Against You
A well-made premium PSD of a 3D character waving can add a human touch to your project quickly, but it demands thoughtful integration. Avoid the pitfalls of flat layers, mismatched lighting, and unclear licensing. Instead, treat the file as a flexible component—edit it, combine it with other graphics, and always test your changes early. Whether you’re a freelancer creating banner ads, a marketer building a landing page, or an educator designing an interactive slide, the right character asset elevates your storytelling. The wave is simple; the quality comes from how well you blend it into the full picture.